Wednesday, 28 September 2016

Active Directoy Site and Service with Replication


Replication being a very important feature in Active Directory. Its replicate the data from once DC to another DC. This maintain up time of the remote site, if there is any network or server issue with from branch to branch. Once you done with primary and secondary DC implement you can see in the Sites and Services there will be a Default First Site, where both DC's added automatically. From site and services console you can create and manage branch of your organization and it help admin to troubleshoot as well keep inventory of the server that which DC belong to which location.
The Primary DC will automatically replicate the data to secondary with help for this terminology. This data gets replicated not in the same physical location as well on remote location too. This can be done and configured from site and services console.
Just to better understanding you can refer this image, which I had done in my lab.


First figure is done in Windows 2003 Root DC (which is primary domain controller) and Second is done in 2012 AD Server (which is child Domain Controller). After Doing Site and services I can see these all are updated and replicated to child as well with Additional Domain Controller.
Had created 2 other sites in my lab to explain more about replication. New site can be create from First Root DC by right click and create new, and here you can put name as per best practise. If you created IP and Subnet also so at second image it will ask you to map the site with specific Subnet and IP. I didnt created any so by default it will map with DefaultIP SiteLink.


In the above image you can see in the ROOTDC 2 connections are automatically added with other 2 DC for replication. It can be done manually but after just finishing AD Site and Services will automatically add replication connection on based of Bandwidth speed and site link objects and the main term is responsible is KCC. By default, the KCC reviews and makes modifications to the Active Directory replication topology every 15 minutes to ensure updating  of data, either directly or transitively, by creating and deleting connection objects as needed. The KCC recognizes changes that occur in the environment and ensures that domain controllers are not orphaned in the replication topology.
By default, KCC checks the topology every 15 minutes. This time cane be modified by changing the Repl topology update period (secs) entry in HKEY_LOCAL_MACHINE\SYSTEM\CurrentControlSet\Services\NTDS\Parameters as follows:
Value: Number of seconds between KCC topology updates
Default: 900 seconds (15 minutes)
Data type: REG_DWORD

Tools to use check replication:
In 2003, to check replication status and troubleshooting you need to install Support tools from ISO under support folder. All tools be installed in program files under support tools folder and here you can get repadmin, replmon which gives you better understanding of replication.
In 2012 to check replication status you have to give this command
repadmin /showrepl <servername> /u:<domainname>\<username> /pw:*
and there is command which helps to understand very deeply of the replication topology of the Forest
repadmin /showrepl * /csv >showrepl.csv

In 2008 there is tool AD replication Monitor , from here you can check and schedule the replication check for the forest and that gives you awesome data with the exact details and error code, that help admins to troubleshoot also. 
This command will give you out in csv format with the below details, now assume what is the data. I can get all the details of Domain Hostname, Site name, replication status, failure reason, and in concern of architect it’s very useful to understand and design the AD network.
There is another tool From MS that is Active Directory Topology Diagram which gives you clear picture of your current environment. Once you will run this tool on your environment, it will take more than 30 min (depend on your environment) and that you can save in XPS or PDF or image.


Here is some common event ID, which generated during replication issue:
Event ID 1388: Inbound replication of the lingering objects
Event ID 1988: Inbound replication of the directory partition of the lingering object has been blocked on the destination domain controller.
Event ID 8606: "Insufficient attributes were given to create an objects
Event Id 8456 or 8457: "The source | destination server is currently rejecting replication requests
Error ID 8453 : Replication access was denied
Event ID 1722: The RPC server is unavailable
Event IDs 1388 and 2042: Replication Lingering Object Problems
Event IDs 1925, 2087, 2088 :Replication DNS Lookup Problems
Event ID 1925 : Replication Connectivity Problems 
  
Lots of there in AD, will be updating as and when I receive. I am sure once you start digging in to AD replication you will find lots of things and its very interesting but some time its bored me due to headache J. That time I just leave and leave.
Here another Option is IP and Subnet, which is like to move a DC with in there IP/Postal Code or region area. Its not restricted to Networking. Its created only to understand and manage that which DC belong to site/Network/Subnet.

Ports Require for AD Replication are
Service Name     UDP    TCP
LDAP                     389      389
LDAP                                  636
LDAP                              3268
Kerboros               88    88
DNS                       53    53
smb over IP      445   445


From here you can see or change that which server is working as Global Catalogue 


Here it shows the connection that from and to replication happening.


Here it shows the objects updated number. USN refer the what was the starting objects and what is the latest.


And Above both image with Single site and multi Replication site will gives you lots of question for AD Scenario. Start brainstorming and raise questions that what how and if…..Let me know if any question there. we are there to assist you. I will be updating the next document as what if there is difference in policy and objects between all domain controller. It’s very Interesting activity. I love this.


Don’t let sleep your zeal to learn and earn.

Wednesday, 7 September 2016

DNS Advanced Configuration with Different MS Server Version

In Lab setup we had installed AD with DNS with basic configuration, now will go with advanced configuration. DNS is basically responsible for resolving name in to UP and vise versa in network and there has lots of changes in MS server from 2003, 2008 and 2012 server. Different concept added to newer server version operating system. Its always recommend that Install DNS with and on the same server with Active Directory.
The very interesting and deep drive question that why this need to be install with AD only, and thte answer would be because DNS provides an enterprise-level tool for organizing, managing, and locating resources in a network.

1.DNS Service will help to locate, find and proper response for Domain Controllers
 Net Logon service use DNS server only to register of domain controllers in your DNS domain namespace

2.DNS servers configured on Windows Server 2003 and 2008 can use AD DS for storing,replicating and reply with proper response in zones.With AD Integrated DNS ,its have more advanced feature like replication, DNS updates, aging, scavenging and more are there.In case of non-integrated AD with DNS Server a single authoritative DNS server for a zone is designated as the primary source for particular zone and this server is responsible and act as owner to maintains the master copy of zone in a local file. With this model, the primary server for the zone represents a single fixed point of failure. If this server is not available, update requests from DNS clients response will be on hold and will get response in error.

In case on Integrated DNS with AD, DNS updates will be sending to other available AD-DNS Integrated server in process of replication.All DNS data is replicated to DNS Server and is updating a period of time, and in worst case if primary or any other server is failed or any issue other DNS Server will respond to that client query.
Integrated DNS is more stable and faster replication in comparison of Non-integrated option Because integrated replication processing is performed on a per-property basis, only relevant changes are propagated. Less data is used and submitted in updates for directory-stored zones.In model of non-integrated structure only primary DNS zones can be stored in the directory. A DNS server cannot store secondary zones in the directory. It must store them in standard text files and in case of AD-DNS integrated tructure the multi master replication model of AD DS removes the need for secondary zones when all zones are stored in AD for the DNS zone.
Below are the main record in DNS
 Host (A) resource records:  domain name to an IP address that is used by a computer.
 Alias (CNAME) resource records:  another primary or canonical name.When a server is used for more than one purpose. Like multiple webpages on single server, FTP.
Mail exchange (MX) resource records: in case of exchanges or forwards mail.
Pointer (PTR) resource records:  IP to Host Name
SOA (start of authority) Declares the host that is authoritative for zone and as per best practise near by source of DNS information for the zone. Each zone having an SOA record.
Service location (SRV) resource records: specified list of DNS host computers that offer a specific type of service, such as Active Directory domain controllers.

IN our scenario, we have 2003 and 2012 DNS Server. let me draw image here to understand DNS concept better.That we can use on all setup :)


Here you can see two images as reference with small and multi DNS structure. in Small DNS Structure its very easy to understand that first Root DNS is acting as primary and having all DNS information. If first stop responding to client query some how due to UN-avoidable situation then as per best practise and the configuration as been done in the network or server the second DNS will start responding to client query.For attached pic if any question just text here

After configuration DNS with AD Services, the zone data automatically replicated to all available server in domain. As its explained that how and why DNS-AD Integrated is better and safe in comparison of non-integrated Infrastructure, another important aspect and feature for integrated is application directory partition.These are directories stored in AD which contains data that is replicated to certain DNS servers, By creating this, your DNS environment will be secure and robust.From this option you can limit the replication with specific 2 DNS servers, to enable this configuration part you have to enlist only those servers.
At the time of Active Directory Integrated zone, there will be two partition build automatically DomainDnsZOnes and ForestDnsZones.

Domain Zone partition will replicate and update the data toll running available domain controllers in the network and  Forest will replicate and update the information to available running domain controller in the forest network.


set aging/scavenging for all zones concept:
 

Scanvenange Stale Resource Records:
I tried to enable this in my lab setup but got this 2502 error.

and Microsoft recommend As per Microsoft: "This behavior occurs if you try to manually scavenge a DNS zone that supports dynamic updates immediately after you enable scavenging. You cannot scavenge the zone until the date and the time in the The zone can be scavenged after box is reached. If you try to manually scavenge the records before this date and time, the event ID 2502 message is logged. To work around this behavior, we recommend that you wait until the date and time that is defined in the The zone can be scavenged after box is reached before you start scavenging"

Basic commands which admins are using frequently
nslookup
ipconfig /flushdns
ipconig /registerdns
ipconfig/displaydns

Now will go through with DNS properties tab and there use for environment.
From here you can set the IP addresses that should handle DNS requests and responses

In Forwarder Tab, Servers are designated to received req or query to forward. Forwarders use DNS communication methods to resolve queries and req to send responses back to other DNS servers You can add the DNS server IP which will act as forwarder.Means If user from different domain want a response from trusted other domain so you can add other domain name here.In this tab there is another option is Do not use recursion for this domain which means if your DNS server failed or you dont want to make more traffic load to response the query, so you can check this box and it will stop resolving queries. Let me explain you with another simple example where if you configured server using conditional forwarding option to resolve queries and request for another domain or trusted domain name in internal zone, and if a response to client req failed, you dont want DNS to continue to search other DNS servers of name resolution. 

If this option is enabled then DNS Server will  respond the client query from its own database only, it will not forward or check with another available or additional DNS servers.As best practise this option should be enabled (Due to security and audit policy in example of trusted domain infrastructure)Disable Recursion status ca be check by running command : Dnscmd /Info /SecureResponses
In 2000 server MS have lots of known issue in DNS cache part, Secure cache against pollution option enable to prevent wrong or malfuntction entries from a serevr to outside domain. if this is allowed to cache, then ther will be name resoltion issue. ipconfig /displaydns command shows the cache entry on the server.

BIND Seondaries: i disabled this option and i found that it impact on zone tranfer. means if i unselect this the zone tranfer was fast and if select then it was very slow in regard of update zone data to another DNS servers.
Reg Setting will be HKLM\SYSTEM\CurrentControlSet\Services\DNS\Parameters with REG_DWORD(Data Type) with Default Value of 1.

Fail On Load If Bad Zone Data:by enabling this option DNS server will fail when there is a bad or malfunation data on zoen,Generally, this is a setting we should not enable

Enable Round Robin:Its a well known term for most of technology, where load balancing comes in feature.To avoid load on one DNS server this terms help to enable load balance. If one server having high traffic for cleint req to ti will move the req to another available DNS server.

Enable Netmask Ordering:If you have computers that have more than one NIC (aka multihomed), this setting allows your DNS server to answer with the address that is on the same subnet of the client.

Secure Cache Against Pollution:If enabled, the DNS server will prevent the caching of resource records that were not answers for the originally issued query.MS Article have explained very well with comparison with other Server version OS(https://support.microsoft.com/en-us/kb/241352)

Root Hints:its shows a list of all DNS servers at the root of the Internet and is used for recursive name resolution.

Debug Logging:It recommended to enable logging that will capture the packet sent and received by DNS servers as a log file. you can capture the DNS traffic as per your requirement. which help to troubleshoot and keep an eye on the DNS data. Event Logging: by default this will log all events, and you can customized it.
Monitoring: A good tool to check DNS staus, as status it will show as pass or fail. Even you can schedule this test as per your requirement.
There are other lots of option in DNS server for configuration on large scale, will be explore and share with you very soon.

Monday, 5 September 2016

Installation, Configuration Phase-1


In continuous of previous article where I installed HYPER-V from power shell command, the current host will be there in Hyper-V manager console and you can see lots of tab and action task is listed. We will go through one by one tab with there properties.

There are more on the HYPER-V concept which as admins we should know and update our self. The hypervisor running directly on the hardware with all the virtual machine resource access serviced through the hypervisor. There are other resources that must be available for a full functioning environment, such as storage and networking.
Different Application and devices have their supporting drivers for Windows, with most written by the independent hardware vendor (IHV). All these different types of storage and network drivers and application should be compatible with Hyper-V environment and Operating system.
There are terms and components run in kernel,as example VMUS which help to enable communication between different types of hardware and services, that enable for non-cpu and memory hardware like storage and networking. Every Virtual Service Provide and support in responding to its virtual client.
The VMBus is not shared between all the child partitions, and there is one channel between each child and the parent so no communication or data can be seen by other child partitions running on the same server. This VMBus does not incur any significant performance penalty even though child partitions wanting to access hardware now essentially communicate via the VSC to a VSP on the VMBus hosted on the parent partition, which communicates to the hardware. This is because the VMBus is actually a pure memory bus running at a kernel level, so there is practically no latency introduced, and by using this model, Microsoft keeps the hypervisor small and secure while still allowing full hardware support for the breadth of the Microsoft hardware ecosystem.

SCSI Controller :Generation 1 virtual machine does not have a SCSI controller, but up to four SCSI controllers can be added to a virtual machine. Once a virtual machine has four SCSI controllers,then option to for SCSI controllers will be grayed out.
In-memory VMBus, SCSI controller is the device which gives essentially the highest, bare-metal storage performance. The term bare-metal indicate for a system or environment that does not use virtualization. oar a non-virtualized environment, Each SCSI controller supports up to 64 hard drives attached, maximum of 256 disks attached via the SCSI bus.
The SCSI controller functionality is more enhanced in Windows Server 2012 R2 like Shared VHDX between multiple virtual machines and Dynamic re-sizing of VHDX.

This Pic will clear the difference between Generation 1VM and Generation 2VM versions.
The following Server operating systems can be installed in a generation 2 virtual machine:
>Windows Server 2012
>Windows Server 2012 R2

Conversion of Virtual Machine from Generation from 1 to Generation 2 is bit difficult due to different constraints because generation 1 virtual machine is BIOS based, which equates to a certain disk configuration such as an NTFS system partition. A generation 2 virtual machine is UEFI based and uses a FAT32 system partition. This alone prohibits moving virtual hard disks between generation 1 and generation 2 virtual machines. Also remember that generation 1 machines boot from the IDE controller and generation 2 machines boot from the SCSI controller. The only way to move from generation 1 to generation 2 is to boot the virtual machine from Windows PE, capture the partitions to a WIM fi le, then redeploy to a generation 2 virtual machine,but this amount of effort is really not worth the benefit t, and generation 2 is best saved for new virtual machines.
Windows Server 2012 R2 Hyper-V has another processor-related setting that is set on a per-virtual-machine basis. This setting is migrate to a physical computer with a different processor version. It is not possible to migrate a virtual machine between Intel and AMD processors using migration technologies due to the completely different architecture and instruction sets of the processor.

To resolve this problem, Hyper-V adds the ability to hide many higher-level functions of processors in the guest operating systems. This means you can move guest operating systems between nodes in a cluster even if the processor versions are different because the virtual operating systems are exposed only to the generic instructions that are present in all versions of the processor family. Note that the functionality does not scan the processors and expose the lowest common set of functionality of all the processors in the cluster; it just limits to a generic basic set.
This can also be set using Power Shell with the following
command:
Set-VMProcessor -CompatibilityForMigrationEnabled $true
Prior to Windows Server 2012 Hyper-V, there was also a setting to enable running older operating systems such as NT 4, but this option has been removed from the Hyper-V manager graphical user interface. The problem for older operating systems is that modern processors return more information about the capabilities than can be handled by the operating system and it will blue screen (this was fi xed in Windows NT 4.0 SP6). This option can still be set, but it must be configured using Power Shell:

Set-VMProcessor -CompatibilityForOlderOperatingSystemsEnabled $true

A great way to understand these two settings is with the help of  the Core info utility from SysInternals, which can list all features for a processor. You will find it at the following location:

Windows Server 2012 introduced a new set of configurations for virtual machine processors,NUMA, but the reality is you should never touch these. Most likely bad things will happen and Hyper-V will make the right configurations for your environment without any manual intervention. This NUMA awareness is also a benefit t for enterprise applications such as SQL, MySQL, and IIS that utilize resources based on NUMA configuration.

A VHD can be up to 2 TB in size, and there are a number of different types of VHDs available:
1.Dynamically expanding: This is the most popular format. Essentially the virtual hard disk is created using a minimal amount of disk space, and as the disk is used, the fi e expands on the fi le system to accommodate the data written to the disk up to the size specified as the size for the virtual hard disk. This option is the most efficient use of the disk space because space is not used on the physical hard drives unless needed. In Windows Server 2008, there was a performance penalty with dynamic disks, such as when a write was performed, the file had to grow. However, the VHD implementation was rewritten in Windows Server 2008 R2, and this performance penalty is negligible. A dynamically expanding disk doesn't shrink if data is deleted unless a compact operation is performed. this type of disk is also commonly refereed to as thinly provisioned because it start off thin and grows as data is written to it.
2. Fixed Size: the size specified for the virtual disk is also to user when the disk is created and so if a 127 GB fixed size virtual disk is created, a 127 GB vhd is created on the hyper-v sever. this is likely to lead to less fragmented virtual hard disk
3. Differencing: a differences disk is linked to a parent virtual disk and only store the changes from the parent disk.
Will create one vm with no os version just to see the tabs, option under properties.
started creating vm on this hypervisor by right click and create new vm
 
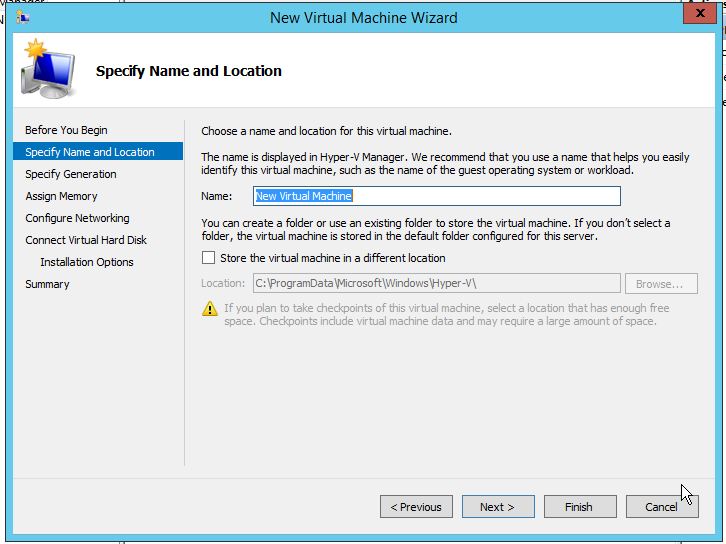
her you can specify name and location of the vm, where you wan to save files of newly created vm.
  This screen well explain about difference in generation-1 and generation-2 type of vm. There is a solution also to change the Generation from 1 to 2.

memory allotment can be done from here
 
This wizard help you for disk related task like you can create new or add existing disk to vm from this option.
 
This option help you to install OS on the vm. you can see in the below of screen shot, it give warning of network adapter because I didnt configured my Hyper-V network stuffs yet :) as this option would need network connection.
  here it will show all vm that are with this hypervisor host or vms managed by this hypervisor host.
  HYPER-V

Sunday, 4 September 2016

VMware More about Log files and Basic Settings with Vsphere


ESXi Host Log Files Path Location:
/var/log/auth.log store ESXi Shell authentication success and failure.
/var/log/dhclient.log store DHCP client logs, including discovery, address
/var/log/esxupdate.log store ESXi patches and update installation logs.
/var/log/hostd.log store Host management service logs, including virtual machine and host tasks and events, communication with the vSphere Client and vCenter Server vpxa agent, and SDK connections.
/var/log/shell.lo ESXi Shell usage. This log file contains a history list of all the commands that have been run at the command line on the host, including enable and disable.
/var/log/sysboot.log store VMkernel startup and module loading.
/var/log/boot.gz A compressed file that contains boot log information and can be read using zcat /var/log/boot.gz|more .
/var/log/syslog.log store Management service initialization, watch dogs, scheduled tasks, and DCUI use.
/var/log/usb.log store USB device arbitration events, such as discovery and pass-through to virtual machines.
/var/log/vob.log store VMkernel observation events, similar to vob.component.event .
/var/log/vmkernel.log store Core VMkernel logs, including device discovery, storage and networking device and driver events, and virtual machine startup.
/var/log/vmkwarning.log store VMkernel warning and alert log messages.
/var/log/vmksummary.log save A summary of ESXi host startup and shutdown and an hourly heartbeat with uptime, number of virtual machines running, and service resource consumption.

vCenter Server Log Files:
vpxd.log The main Server log file that communicates with the vCenter Server Agent (vpxa), which is located on connected ESXi hosts. This log file is useful for troubleshooting configuration and operational errors.
vpxd- This log file is useful for troubleshooting performance issues.
\drmdump\clusternnn\ DRS actions, grouped by the DRS cluster. The log files are gzipped.

Admins can see the ESXi log files using the command line by logging in ESXi Shell and running commands like cat , tail , more , less , or any command that allows you to view a file. The tail –f <filename> is a commonly used command-line command that helps to see changes being added to the log file as they happen. By this command in the background, which keeps the log file open. The other friendly option to view log files by using the vSphere Client and login to the ESXi host. The vCenter Server log files can be viewed directly on the Windows host system or by using the vSphere Client.
One of the changes that was made in vSphere version 5 logging was to separate all the log files to diagnose and troubleshoot, which will help to identify the issue and solution.
Here writing a short description about files that are responsible when a vm creation happen
The .nvram file : This small file contains the BIOS that is used when the VM boots, changes made to the hardware configuration for the VM are saved in the NVRAM file. The very great point that if file is deleted it will be automatically re-created when a VM is powered on.

The .vmx file. This file contains all of the configuration information with hardware settings. The setting which are made as part of that information is stored in text format in this file. This file can contain a variety of information about the VM i.e., RAM size, network interface card info, hard drive info and serial/parallel port info, advanced power and resource settings, VMware tools options and power management options.

VMDK files. store the contents of the virtual machine hard disk drive. These files are stored in the same directory as the .vmx file. A virtual disk is made up of one or more virtual disk files.

flat.vmdk file : Default and large virtual disk data file that is created when you add a virtual hard drive to your VM that is not an RDM.
Thick disks: this file will be approximately the same size as what you specify when you create your virtual hard drive.

delta.vmdk file : this file is create when you take snapshot of a vm. All writes to the original -flat.vmdk are halted and it becomes read-only; changes to the virtual disk are then written to these -delta files instead. The initial size of these files is 16 MB and they are grown as needed in 16 MB increments as changes are made to the VM's virtual hard disk. Because these files are a bitmap of the changes made to a virtual disk, a single -delta.vmdk file cannot exceed the size of the original -flat.vmdk file. A delta file will be created when you take snapshot and file names will be incremented numerically (i.e., vm-000001-delta.vmdk, vm-000002-delta.vmdk). These files are automatically deleted after they are merged in to the vmdk file.

The -rdm.vmdk file:This is the mapping file for the raw device mapping (RDM) format that manages mapping data for the RDM device. The disk file is presented to the ESX host as an ordinary disk file.The storage virtualization layer presents the mapped device as a virtual SCSI device.

The .vswp file : Memory swap file is created that can be used in lieu of physical host memory if ESX host exhausts all its physical memory because due to overcommitted. These files are created equal in size to the amount of memory assigned to a VM, minus any memory reservations (default is 0) that a VM may have set on it (i.e., a 4 GB VM with a 1 GB reservation will have a 3 GB VSWP file created). These files are always created for virtual machines but only used if a host exhausts all of its physical memory. In this period of time VMs can have performance issue. These files can take up quite a large amount of disk space on your VMFS volumes, so ensure that you have adequate space available for them, as a VM will not power on if there is not enough room to create this file. These files are deleted when a VM is powered off or suspended. Virtual machines will lock the .vswp, -flat.vmdk and -delta.vmdk, .vmx and .log files during time.

The .vmss file. This file is used when virtual machines are suspended state. Size of this will is approximately the same size as the amount of RAM that is assigned to a VM. When a VM is brought out of a suspend state, the contents of this file are written back into the physical memory of a host server, however the file is not automatically deleted until a VM is powered off (an OS reboot won't work). If a previous suspend file exists when a VM is suspended again, this file is re-used instead of deleted and re-created. If this file is deleted while the VM is suspended, then the VM will start normally and not from a suspended state. This is very helpful when you have to find the root cause of the OS level issue, you can convert this in to memory dump and diagnose the issue.

The .vmsd file. This file is used with snapshots to store metadata and other information about each snapshot that is active on a VM. This text file is initially 0 bytes in starting. It updated the with information every time snapshots are created or deleted. It show display name and description, and the UID of the snapshot. Once snapshots are deleted, this file retains old snapshot information but increments the snapshot UID to be used with new snapshots. It also renames the first snapshot to "Consolidate Helper," presumably to be used with consolidated backups.

The .vmsn file. This file is used with snapshots to store the state of a virtual machine when a snapshot is taken. A separate .vmsn file is created for every snapshot that is created on a VM and is automatically deleted when the snapshot is deleted. The size of this file will vary based on whether or not you choose to include the VM's memory state with your snapshot. If you do choose to store the memory state, this file will be slightly larger than the amount of RAM that has been assigned to the VM, as the entire memory contents, including empty memory, is copied to this file. If you do not choose to store the memory state of the snapshot then this file will be fairly small (under 32 KB). This file is similar in nature to the .vmss that is used when VMs are suspended.

The .log file. LOG files are created to log information about the virtual machine and are often used for troubleshooting purposes. There will be a number of these files present in a VM's directory. The current log file is always named vmware.log and up to six older log files will also be retained with a number at the end of their names (i.e., vmware-2.log). A new log file is created either when a VM is powered off and back on or if the log file reaches the maximum defined size limit. The amount of log files that are retained and the maximum size limits are both defined as VM advanced configuration parameters (log.rotateSize and log.keepOld).

After VCenter Installation, can see in service console that vm related services are there with manual, automatic and automatic (delayed start) status.


After login to VCenter first time, Admins should add the group or individuals domain user names that will be responsible to manage the VMware environment. From here you can give different level of access. Like Administrator Role, Read Only, and that are need to be done from Permission tab of VCenter. By default administrator@vsphere.local would be authorised to login from vsphere client. I gave Administrators, Administrator as Admin access.


There are 9 different access roles which you can use and assign permission as per access level.
There are other configuration also require on VCenter level.

From this tab only HA and DRS feature can be on and off on the vm cluster 


Try to keep virtual machine sizing requirements similar across all configured virtual machines. The Host Failures Cluster Tolerates admission control policy uses slot sizes to calculate the amount of capacity needed to reserve for each virtual machine. The slot size is based on the largest reserved memory and CPU needed for any virtual machine. When you mix virtual machines of different CPU and memory requirements, the slot size calculation defaults to the largest possible, which limits consolidation.

Admission control is used to ensure that sufficient resources are available in a cluster to provide failover protection and to ensure that virtual machine resource reservations are respected. There are three Admission control policies:
1. Specify Failover Hosts Admission Control Policy
2. Percentage of Cluster Resources Reserved Admission Control Policy
3. Host Failures Cluster Tolerates Admission Control Policy

The following recommendations are best practices for vSphere HA admission control:
  1. Select the Percentage of Cluster Resources Reserved admission control policy. This policy offers the most flexibility in terms of host and virtual machine sizing. When configuring this policy, choose a percentage for CPU and memory that reflects the number of host failures you want to support. For example, if you want vSphere HA to set aside resources for two host failures and have ten hosts of equal capacity in the cluster, then specify 20% (2/10).
  1. Ensure that you size all cluster hosts equally. For the Host Failures Cluster Tolerates policy, an unbalanced cluster results in excess capacity being reserved to handle failures because vSphere HA reserves capacity for the largest hosts. For the Percentage of Cluster Resources Policy, an unbalanced cluster requires that you specify larger percentages than would otherwise be necessary to reserve enough capacity for the anticipated number of host failures.
  1. If you plan to use the Host Failures Cluster Tolerates policy, try to keep virtual machine sizing requirements similar across all configured virtual machines. This policy uses slot sizes to calculate the amount of capacity needed to reserve for each virtual machine. The slot size is based on the largest reserved memory and CPU needed for any virtual machine. When you mix virtual machines of different CPU and memory requirements, the slot size calculation defaults to the largest possible, which limits consolidation.
  1. If you plan to use the Specify Failover Hosts policy, decide how many host failures to support and then specify this number of hosts as failover hosts. If the cluster is unbalanced, the designated failover hosts should be at least the same size as the non-failover hosts in your cluster. This ensures that there is adequate capacity in case of failure.
Its very important part of HA configuration and wil be covering in more advanced very soon.


Here you can configure restart priority and isolation process.

 Its all default settings,and will be covering in more details very soon

VMware Datastore Hearbeating provides an additional option for determining if host is in failed state or not.

vCenter automatically selects at least two datastores from the shared datastores(to enable this yu should have atleast 2 shared datastorage). It’s preferable to have VMware Datastore heartbeating selected on every storage device in vmware environment. It can be check from the properties cluster that which datastores has been selected.

This option enables to avoid false restarting of VMs in cluster in case only a management network has failed. The default number of heartbeat datastores is two, and maximum valid heartbeat is five. It can override the default value by an editing advanced attribute: das.heartbeatdsperhost.

 This option enable automation level, in example at time of high memory, cpu or storage utilization on host, so how DRS should react. In Manual option, every time admins to run DRS and then it will show recommendation. In Partially option, vcenter will recommend to migrate the vms to another or which host. In Fully Automated option vcenter will itslef do all actions which are require to balance the cluster performance.

An important thing to remember is that even with DRS Groups in place, VMware High Availability will not be inhibited by these rules. In this option you can specifiy the at the time of action which vm will be moved to which host and other criteria. its usefull in terms of Licensing, where its based on quantiy or bind with specific host for application vendor.

Here Affinity and Anti-Affintiy rules work. In circumstances where application require that any two move should move together to specific host is called Affinity Rules, and in case of Domain controller, where as per best practice it should be configured like that 2 Domain controller should not be on same host. Hope you got the point where am trying to highlight the concept.Will be configuring this option later in lab.

Level of automation in Vsphere are
1. Fully Automated
2 .Partially Automated
3. Manual
4.Default
5. Disabled

 In this option vcenter will recommend and suggest as per option. In Off Mode no recommendation, In Manual it will display the recommendation but action would require manual intervention and as word explain automatic, it will recommend and perform the action with any human or manual activity.

It shows for all host in cluster when last time power management was applied


EVC allows to migrate vm between different generation of CPUs.EVC cannot enable vMotions between AMD and Intel processors, a VM can have problems if vMotioned to a host with a differing set of CPU instructions. We will be doing more on later very soon.

 From here you can save the swapfile location for vms in cluster.